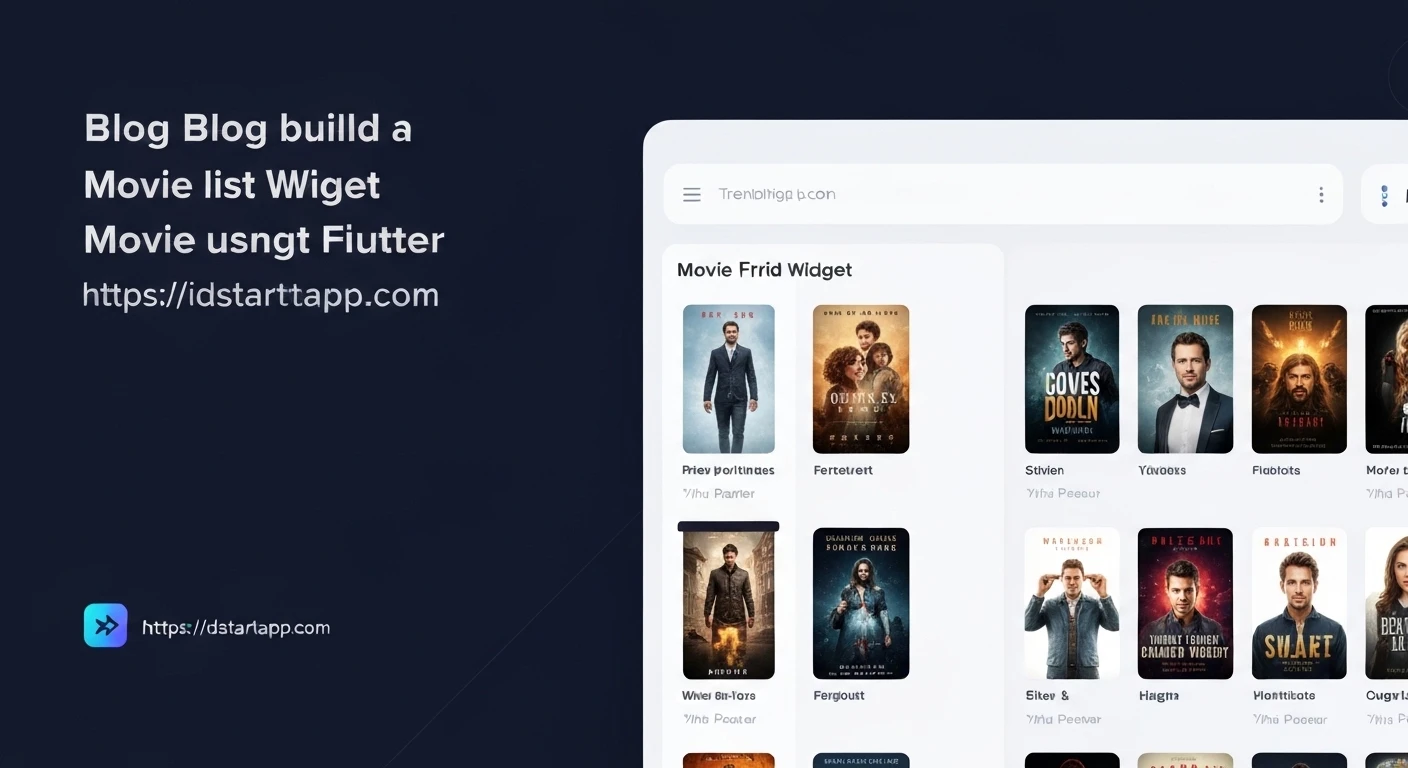

Building a Movie List Widget with Poster Grid in Flutter
Creating an engaging user interface for displaying lists of items is a common requirement in many mobile applications. For movie apps, a visually rich poster grid is essential to captivate users. Flutter, with its declarative UI and powerful widget system, makes building such interfaces intuitive and performant. This article will guide you through the process of constructing a movie list widget featuring a poster grid in Flutter, from data modeling to UI implementation.
1. Project Setup
First, ensure you have Flutter installed. If not, refer to the official Flutter documentation. Create a new Flutter project:
flutter create movie_app
cd movie_app
You can then open the project in your preferred IDE (VS Code, Android Studio).
2. Defining the Movie Data Model
Before we build the UI, we need a way to represent our movie data. Let's create a simple Movie class with basic properties like id, title, and posterUrl. Create a new file, e.g., lib/models/movie.dart:
// lib/models/movie.dart
class Movie {
  final String id;
  final String title;
  final String posterUrl;

  Movie({
    required this.id,
    required this.title,
    required this.posterUrl,
  });
}
3. Preparing Mock Movie Data
For demonstration purposes, we'll use mock data. In a real application, you would fetch this data from an API (e.g., The Movie Database API). Let's create a list of dummy movies. Create lib/data/mock_movies.dart:
// lib/data/mock_movies.dart
import '../models/movie.dart';

final List<Movie> mockMovies = [
  Movie(
    id: '1',
    title: 'The Shawshank Redemption',
    posterUrl: 'https://m.media-amazon.com/images/M/MV5BNDE3ODcxYzMtY2YzZC00NmJkLWFkMDAtNTg3NDg2ZjRjMDhjXkEyXkFqcGdeQXVyMTA4NjE0NjEy._V1_QL75_UX190_CR0,0,190,281_.jpg',
  ),
  Movie(
    id: '2',
    title: 'The Godfather',
    posterUrl: 'https://m.media-amazon.com/images/M/MV5BM2MyNjYxNmUtYjQyOS00NGYxLWEzYzctNDc3NWQ5NDYwNTc2XkEyXkFqcGdeQXVyNzkwMjQ5NzM@._V1_QL75_UX190_CR0,0,190,281_.jpg',
  ),
  Movie(
    id: '3',
    title: 'The Dark Knight',
    posterUrl: 'https://m.media-amazon.com/images/M/MV5BMTMxNTMwODM0NF5BMl5BanBnXkFtZTcwODAyMTk2Mw@@._V1_QL75_UX190_CR0,0,190,281_.jpg',
  ),
  Movie(
    id: '4',
    title: 'Pulp Fiction',
    posterUrl: 'https://m.media-amazon.com/images/M/MV5BNGNhMDIzZTUtNTBlZi00MTRlLWFjM2ItYzViMjYxNjdlNTM3XkEyXkFqcGdeQXVyMjYwNDA2MDE@._V1_QL75_UX190_CR0,0,190,281_.jpg',
  ),
  Movie(
    id: '5',
    title: 'Forrest Gump',
    posterUrl: 'https://m.media-amazon.com/images/M/MV5BNWIwODc4MjEtNWMyZC00MmE3LTkxYmQtNDIxYmEzZGYwNTkzXkEyXkFqcGdeQXVyMjAzNDQyNjU@._V1_QL75_UX190_CR0,0,190,281_.jpg',
  ),
  Movie(
    id: '6',
    title: 'Inception',
    posterUrl: 'https://m.media-amazon.com/images/M/MV5BMjAxMzYwYTEtNzIwNi00YTMxLWE3NzItMDI2ODkyMGM3MWY4XkEyXkFqcGdeQXVyMTE0MzQwMjky._V1_QL75_UX190_CR0,0,190,281_.jpg',
  ),
  Movie(
    id: '7',
    title: 'The Matrix',
    posterUrl: 'https://m.media-amazon.com/images/M/MV5BNzQzOTU3ODktNDg0Zi00ZWYtOWRlYy0zZDZkZmNhMDJlYjcwXkEyXkFqcGdeQXVyMTE0MzQwMjky._V1_QL75_UX190_CR0,0,190,281_.jpg',
  ),
  Movie(
    id: '8',
    title: 'Fight Club',
    posterUrl: 'https://m.media-amazon.com/images/M/MV5BNWJmYjc0NzUtOWVkZC00YzUzLWI2OGEtZWI0YjUzNTYxMTU0XkEyXkFqcGdeQXVyNzkwMjQ5NzM@._V1_QL75_UX190_CR0,0,190,281_.jpg',
  ),
  Movie(
    id: '9',
    title: 'Interstellar',
    posterUrl: 'https://m.media-amazon.com/images/M/MV5BMjI0NTQ0NjU1N15BMl5BanBnXkFtZTgwNTU5Nzc5MTE@._V1_QL75_UX190_CR0,0,190,281_.jpg',
  ),
  Movie(
    id: '10',
    title: 'The Lord of the Rings',
    posterUrl: 'https://m.media-amazon.com/images/M/MV5BNzgxYzA4NDYtZjIyMy00MGUxLWIxNGEtM2EzODMyNTUzYzgwXkEyXkFqcGdeQXVyMDM2NDM2MQ@@._V1_QL75_UX190_CR0,0,190,281_.jpg',
  ),
];
4. Creating the Movie Poster Widget
Each item in our grid will be a movie poster. Let's create a reusable widget for this. It will display the movie's poster image and can be extended to show the title or other details. Create lib/widgets/movie_poster.dart:
// lib/widgets/movie_poster.dart
import 'package:flutter/material.dart';

class MoviePoster extends StatelessWidget {
  final String posterUrl;
  final String title;
  final VoidCallback? onTap;

  const MoviePoster({
    super.key,
    required this.posterUrl,
    required this.title,
    this.onTap,
  });

  @override
  Widget build(BuildContext context) {
    return GestureDetector(
      onTap: onTap,
      child: Container(
        decoration: BoxDecoration(
          borderRadius: BorderRadius.circular(8.0),
          boxShadow: [
            BoxShadow(
              color: Colors.black.withOpacity(0.3),
              spreadRadius: 1,
              blurRadius: 5,
              offset: const Offset(0, 3),
            ),
          ],
        ),
        clipBehavior: Clip.antiAlias, // Ensures content respects border radius
        child: Image.network(
          posterUrl,
          fit: BoxFit.cover,
          errorBuilder: (context, error, stackTrace) {
            return Container(
              color: Colors.grey[300],
              child: const Center(
                child: Icon(Icons.broken_image, size: 48, color: Colors.grey),
              ),
            );
          },
          loadingBuilder: (context, child, loadingProgress) {
            if (loadingProgress == null) return child;
            return Container(
              color: Colors.grey[200],
              child: Center(
                child: CircularProgressIndicator(
                  value: loadingProgress.expectedTotalBytes != null
                      ? loadingProgress.cumulativeBytesLoaded /
                          loadingProgress.expectedTotalBytes!
                      : null,
                ),
              ),
            );
          },
        ),
      ),
    );
  }
}
5. Building the Movie Grid Widget
Now, let's create the widget that arranges multiple MoviePoster widgets in a grid. We'll use GridView.builder for efficiency, especially with large lists, as it only builds items that are visible on screen. Create lib/widgets/movie_grid.dart:
// lib/widgets/movie_grid.dart
import 'package:flutter/material.dart';
import '../models/movie.dart';
import 'movie_poster.dart';

class MovieGrid extends StatelessWidget {
  final List<Movie> movies;

  const MovieGrid({super.key, required this.movies});

  @override
  Widget build(BuildContext context) {
    return GridView.builder(
      padding: const EdgeInsets.all(12.0),
      gridDelegate: const SliverGridDelegateWithFixedCrossAxisCount(
        crossAxisCount: 2, // Number of columns in the grid
        crossAxisSpacing: 12.0, // Spacing between columns
        mainAxisSpacing: 12.0, // Spacing between rows
        childAspectRatio: 0.7, // Aspect ratio of each item (width / height)
      ),
      itemCount: movies.length,
      itemBuilder: (context, index) {
        final movie = movies[index];
        return MoviePoster(
          posterUrl: movie.posterUrl,
          title: movie.title,
          onTap: () {
            // TODO: Implement navigation to movie detail page
            ScaffoldMessenger.of(context).showSnackBar(
              SnackBar(content: Text('Tapped on ${movie.title}')),
            );
          },
        );
      },
    );
  }
}
The SliverGridDelegateWithFixedCrossAxisCount is perfect for a fixed number of columns. You can adjust crossAxisCount, crossAxisSpacing, mainAxisSpacing, and childAspectRatio to control the grid's layout and appearance.
6. Integrating into the Main Application
Finally, let's integrate our MovieGrid into the main Scaffold. Open lib/main.dart and replace its content:
// lib/main.dart
import 'package:flutter/material.dart';
import 'data/mock_movies.dart'; // Import your mock data
import 'widgets/movie_grid.dart'; // Import your MovieGrid widget

void main() {
  runApp(const MyApp());
}

class MyApp extends StatelessWidget {
  const MyApp({super.key});

  @override
  Widget build(BuildContext context) {
    return MaterialApp(
      title: 'Movie Poster Grid',
      theme: ThemeData(
        primarySwatch: Colors.blueGrey,
        visualDensity: VisualDensity.adaptivePlatformDensity,
      ),
      home: const MovieListPage(),
    );
  }
}

class MovieListPage extends StatelessWidget {
  const MovieListPage({super.key});

  @override
  Widget build(BuildContext context) {
    return Scaffold(
      appBar: AppBar(
        title: const Text('Movies'),
        centerTitle: true,
      ),
      body: MovieGrid(
        movies: mockMovies, // Pass your mock movie data to the grid
      ),
    );
  }
}
Run your application:
flutter run
You should now see a scrollable grid of movie posters on your device or simulator.
7. Enhancements and Next Steps
This is a foundational setup. Here are some ideas for further enhancements:
- Real API Integration: Replace
mockMovieswith actual data fetched from a movie API (e.g., TMDB, OMDb) using packages likehttpordio. - Loading States: Implement loading indicators while fetching data and error messages if the fetch fails.
- Detail Screen: When a poster is tapped, navigate to a new screen displaying detailed information about the movie.
- Responsiveness: Adjust
crossAxisCountinSliverGridDelegateWithFixedCrossAxisCountbased on screen width usingMediaQuery.of(context).size.widthto display more columns on larger screens (e.g., tablets). - Search and Filtering: Add a search bar or filter options to narrow down the movie list.
- Infinite Scrolling: For large datasets, implement pagination and load more movies as the user scrolls to the end of the list.
- Better Styling: Add movie titles overlayed on posters, ratings, genre tags, and more sophisticated animations.
Conclusion
You've successfully built a dynamic movie list widget with a poster grid in Flutter. By combining a clear data model, reusable widgets like MoviePoster, and efficient list builders like GridView.builder, Flutter allows you to create stunning and performant user interfaces with remarkable ease. This foundation can now be extended with more advanced features to create a full-fledged movie application.


